How To: Add Test Coverage to your Serverless Applications
Adding test coverage to our Serverless framework projects helps us to ensure that we are effectively testing our production-level applications.
Writing serverless functions brings developers closer and closer to the stack that runs their code. While this gives them a tremendous amount of freedom, it also adds additional responsibility. Serverless applications require developers to think more about security and optimizations, as well as perform other tasks that were traditionally assigned to operations teams. And of course, code quality and proper testing continue to be at the top of the list for production-level applications. In this post, we'll look at how to add test coverage to our Node.js applications and how we can apply it to our Serverless framework projects. ⚡️
What is Test Coverage and why should I care?
If you're familiar with test coverage, you can skip this and go right to the Testing our Serverless functions section. If you're new to test coverage, or are curious how to install it, then I suggest you read through this whole post.
Test coverage (or code coverage) is a measure used to describe the degree to which the source code of a program is executed when a particular test suite runs. ~ Wikipedia
I'm hoping that you are already writing a bunch of tests against your Serverless functions. It would be a little crazy not to be. 😳 But do you know how much of your code is actually being tested? Do you know which branches are executed? Which functions are run? That's what test coverage can tell us. We can run reports that will show us all kinds of detailed information about just how comprehensive our tests are. Without test coverage, we have to do a lot of guessing (or some really tedious manual investigation).
Test Coverage Basics ✅
Before we jump in to adding code coverage to our Serverless functions, let's take a minute to review the basics of test coverage and how to set up a Node.js project with all the necessary dependencies.
Let's create a project directory and a package.json file.
1> mkdir test-coverage-sample2> cd test-coverage-sample3> npm init
Fill out the prompts (you can just accept the defaults for now):
1This utility will walk you through creating a package.json file.2It only covers the most common items, and tries to guess sensible defaults.34See `npm help json` for definitive documentation on these fields5and exactly what they do.67Use `npm install` afterwards to install a package and 8save it as a dependency in the package.json file.910Press ^C at any time to quit.11package name: (test-coverage-sample) 12version: (1.0.0) 13description: Our test coverage sample14entry point: (index.js) 15test command: 16git repository: 17keywords: 18author: Jeremy Daly19license: (ISC) 20About to write to ./test-coverage-sample/package.json:2122{23 "name": "test-coverage-sample",24 "version": "1.0.0",25 "description": "Our test coverage sample",26 "main": "index.js",27 "scripts": {28 "test": "echo \"Error: no test specified\" && exit 1"29 },30 "author": "Jeremy Daly ", 31 "license": "ISC"32}3334> Is this OK? (yes) yes
Now install Mocha (test framework), Chai (assertion library) and Istanbul (test coverage tool) as dev dependencies. Note that we'll be installing the nyc package instead of istanbul. nyc is Istanbul's command line utility which we need to wrap our Mocha tests. You can also use several other test frameworks with Istanbul, but I prefer Mocha.
1> npm i mocha chai nyc -D
Great. Our package.json file should look something like this:
1{2 "name": "test-coverage-sample",3 "version": "1.0.0",4 "description": "Our test coverage sample",5 "main": "index.js",6 "scripts": {7 "test": "echo \"Error: no test specified\" && exit 1"8 },9 "author": "Jeremy Daly <contact@jeremydaly.com>",10 "license": "ISC",11 "devDependencies": {12 "chai": "^4.1.2",13 "mocha": "^5.2.0",14 "nyc": "^12.0.2"15 }16}
If everything looks good, we can start writing some code.
Writing our tests
Let's create our index.js file and write a few functions to test.
1> touch index.js
If you are typically a TDD person (Test-Driven Development), then you'd write tests first. We're going to write our code first so that we can show you how test coverage reporting works.
Let's open our index.js file and add the following code:
1'use strict'23exports.times = (a,b) => {4 if (a >= 10) {5 return (a-9) * b6 } else {7 return a * b8 }9}1011exports.switch = (input) => {12 switch(input) {13 case 1:14 return 'one'15 case 2:16 return 'two'17 case 3:18 return 'three'19 case 4:20 return 'four'21 default:22 return 'unknown'23 } // end switch24}2526exports.pow = (num,pow) => num ** pow
These are obviously trivial functions, but we're using them for illustration purposes.
Let's write our first test:
1> mkdir test2> cd test3> touch sample-test.js
Open sample-test.js and add the following code:
1'use strict'23const expect = require('chai').expect4const sample = require('../index.js')56describe('Sample Test Script', function() {78})
Here we're requiring our assertion library (Chai) and our index.js file. We've also created a describe wrapper function to group tests. Note that we are not using arrow functions in our tests (e.g. () => {}). Arrow functions do not bind their own this object, so Mocha can't access its own scope. For more information on writing Mocha tests, check out the documentation.
Now we'll write a simple test against our times() function. This test should be nested inside our main describe function.
1describe('times()', function() {2 it('should equal 10', function() {3 expect(sample.times(2,5)).to.equal(10)4 })5})
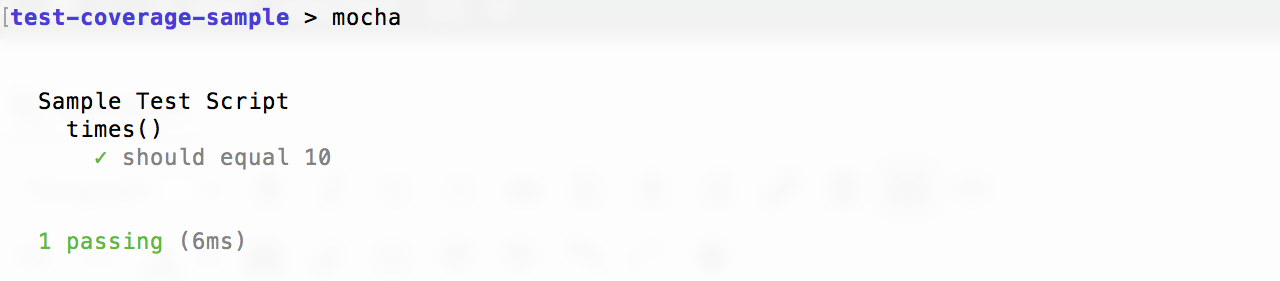
Awesome, now we can run Mocha to test our script:
1> mocha
We should get:
index.js script. We're obviously missing a lot of tests though. With such a simple script, it is probably fairly easy for us to figure out which parts of our code aren't being tested. However, as our applications grow in complexity and scope, it will become an incredibly difficult challenge. That's were test coverage comes in!
Running a test coverage report
We've already set up our project with nyc (Istanbul's CLI), so all we need to do is run it with Mocha:
1> nyc mocha
Now we should get something like this:
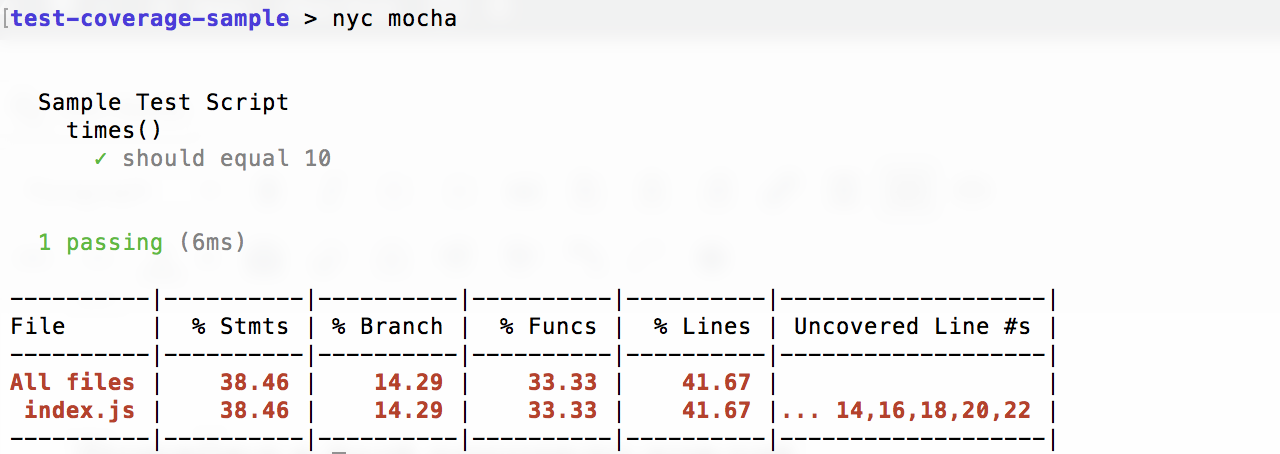
You can see from the output above that our index.js file only has 38.46% of its statements, 14.29% of its branches, 33.33% of its functions and 41.67% of its lines covered. We'll discuss these more in a bit, but let's talk about the report itself first. Even though it tells us the "Uncovered Line #s", it doesn't give us a lot of detail. Not a problem! Let's use a reporter to generate a more comprehensive and useful report.
nyc comes with a built-in html reporter. We just need to run it with the --reporter=html flag:
1> nyc --reporter=html mocha
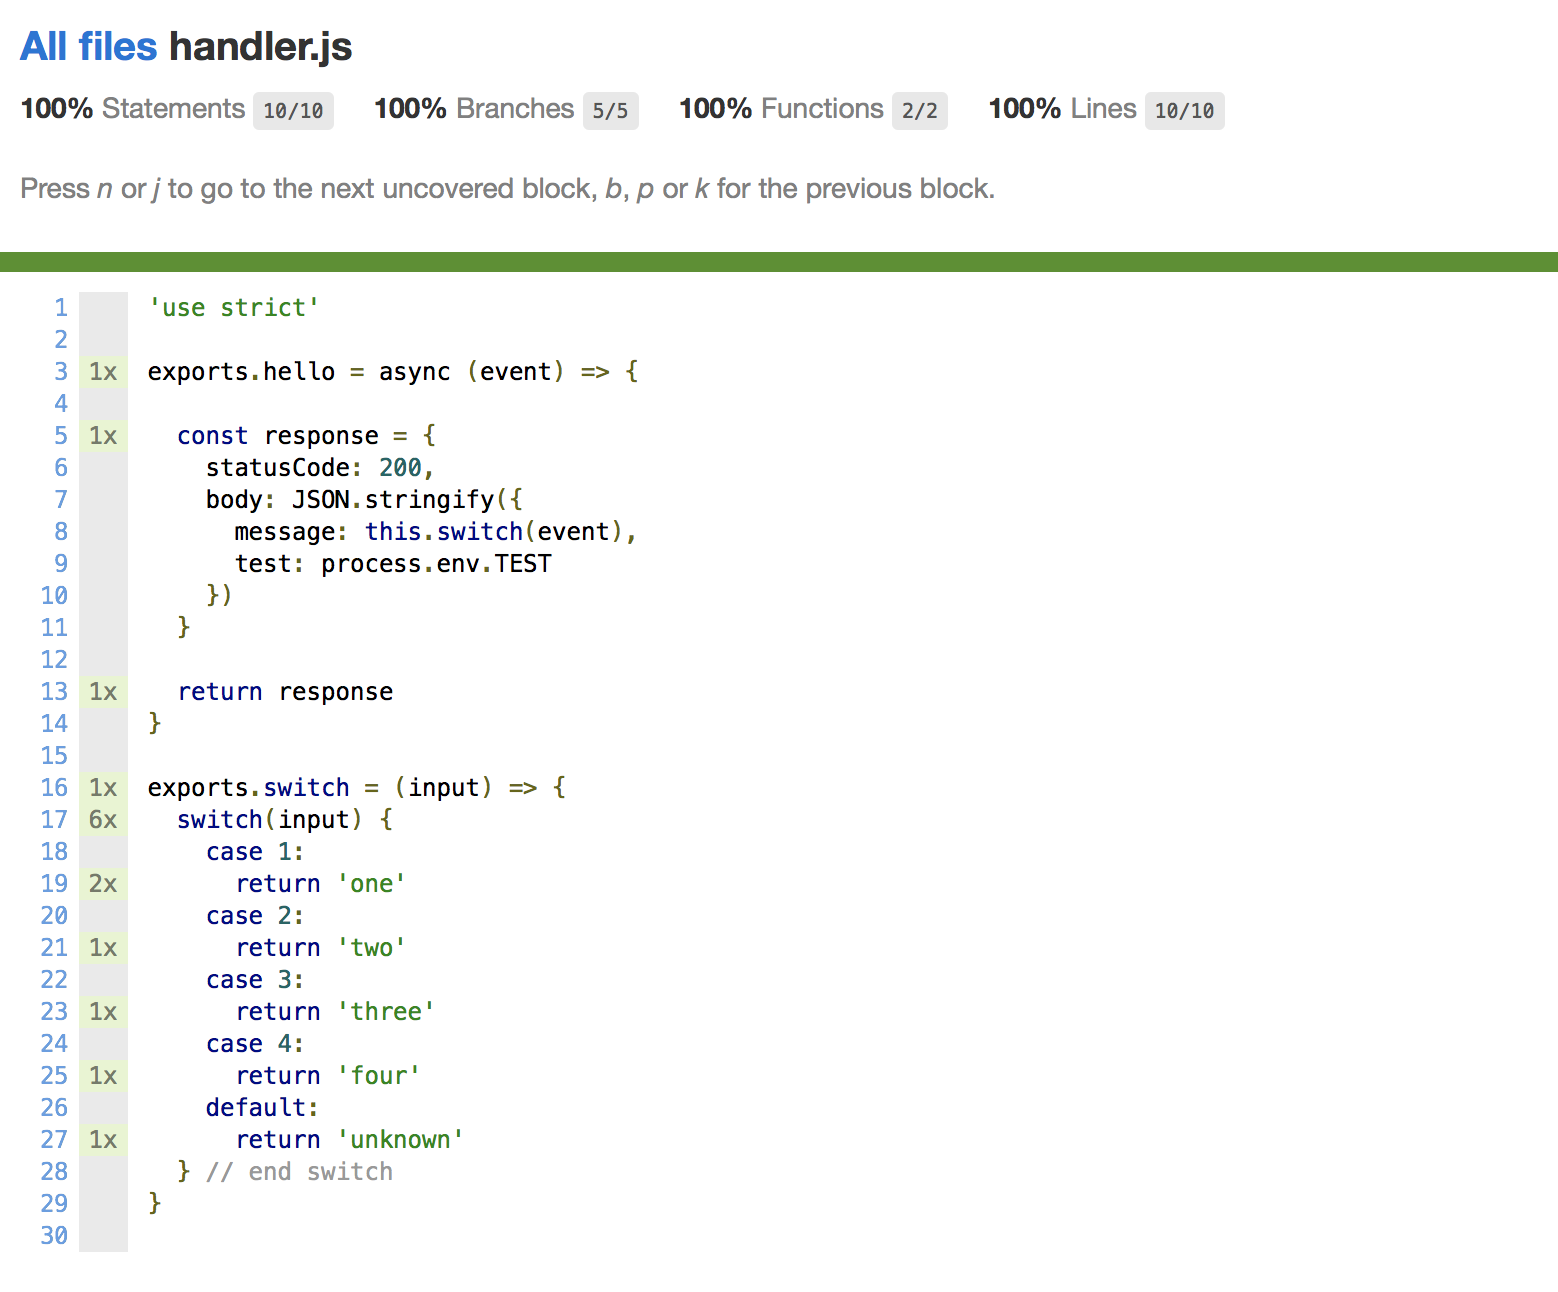
This will create a coverage directory in your project folder. If we open coverage/index.html we get:
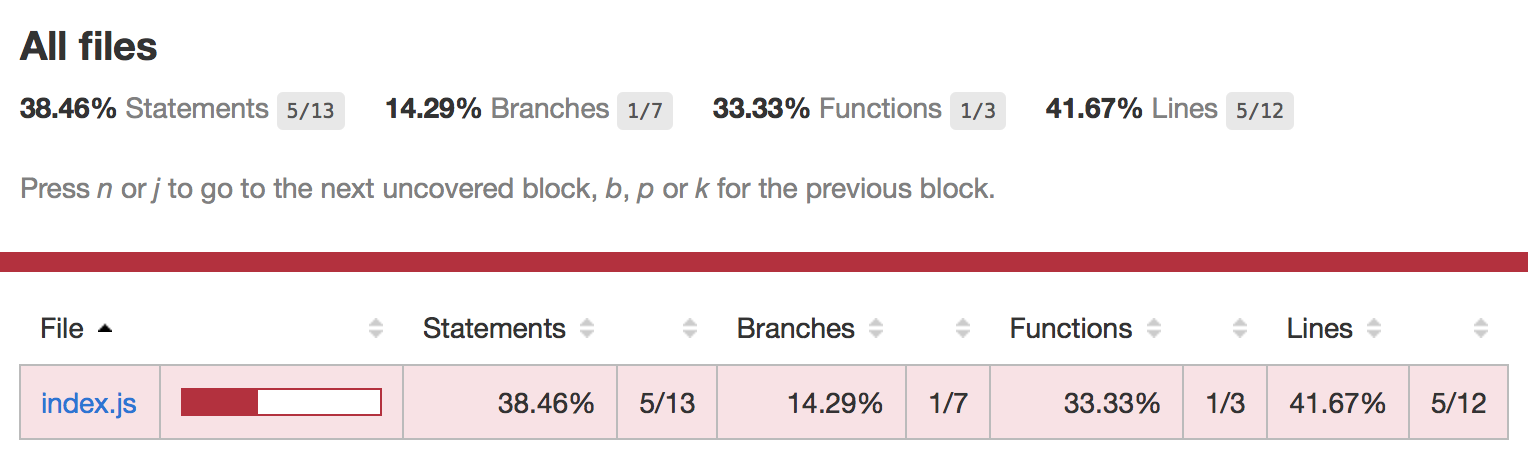
Here we'll see a prettier version of our CLI report with a little more detail. Plus, if we have multiple files that we're testing, we can use this interface to sort, which is a great feature.
But wait, there's more! If we click on the file name, we get this:
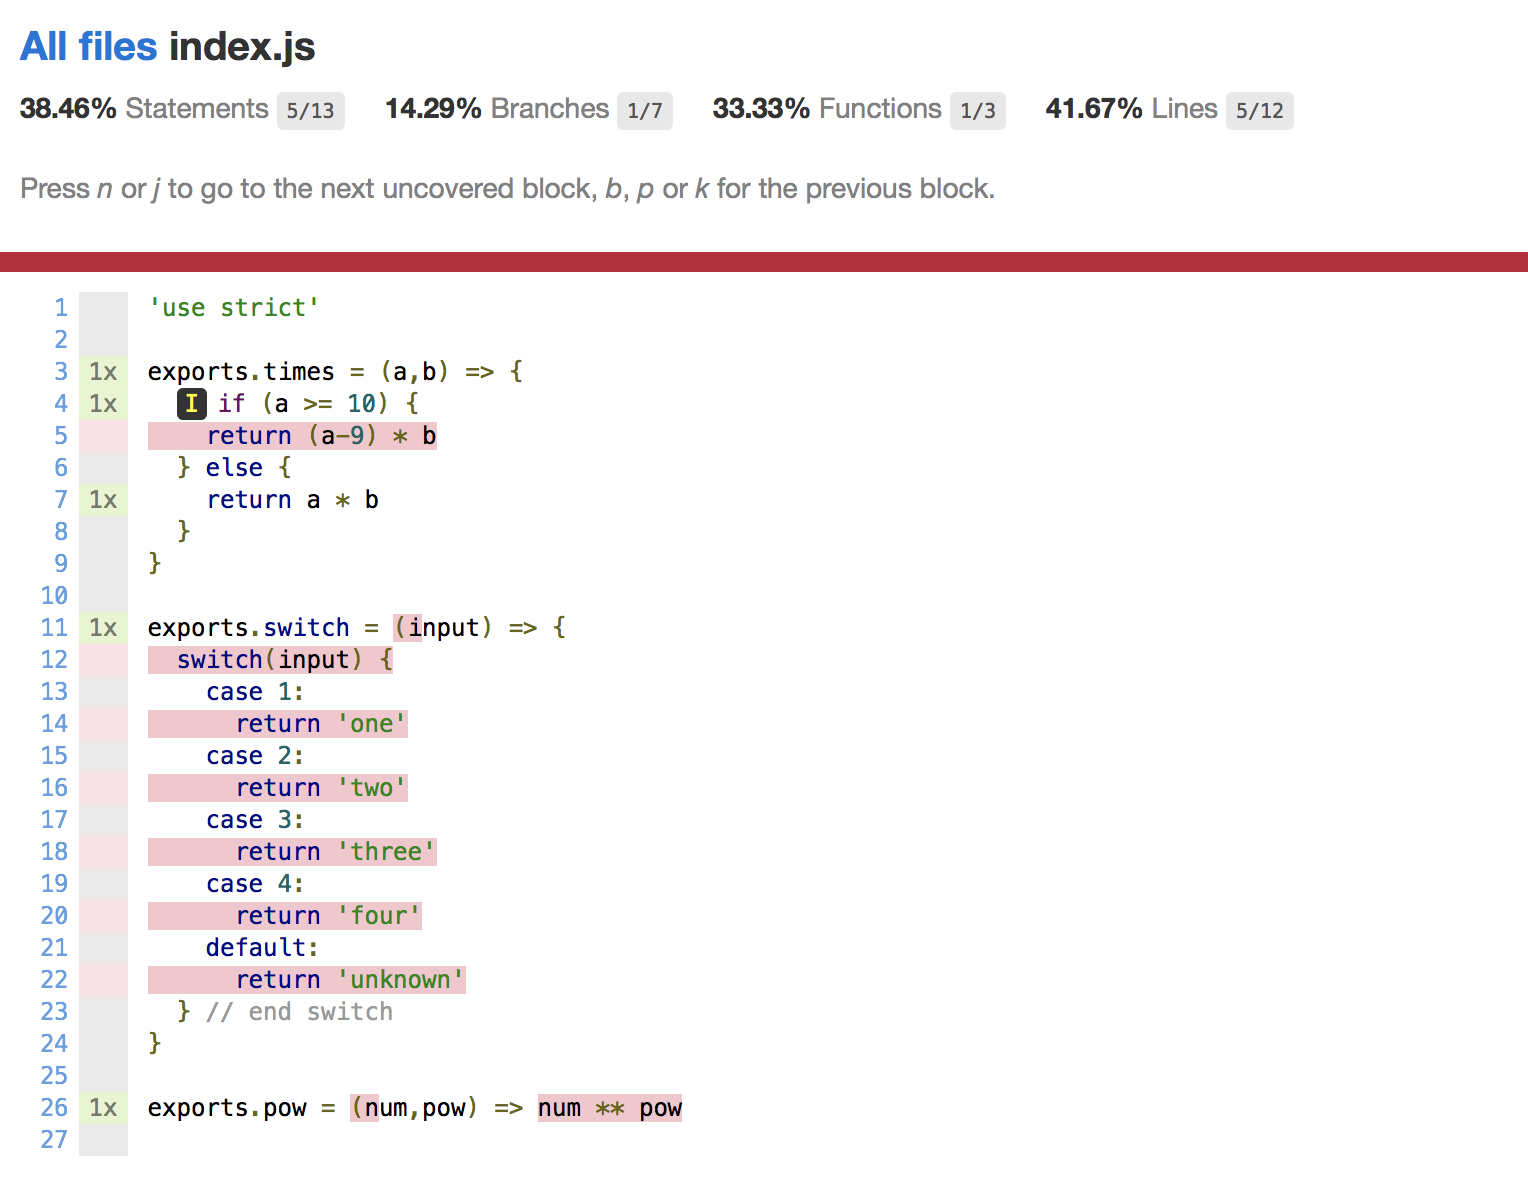
This is a heck of a lot more useful! This detailed report will show our code (line-by-line) with execution counts and highlights showing us uncovered statements, branches, and functions.
Understanding the code coverage report
Istanbul reports on the number of S_tatements_, Branches, Functions and Lines that are covered in your code. Let's look at what each one means and understand some of the limitations.
Statements: A statement is a syntactic unit of an imperative programming language that expresses some action to be carried out (Wikipedia). This would include things like ifs, calculations in your code, and any function with arguments. There are 13 statements in our code above. See if you can find them all. Note that the case statements aren't consider statements.
Branches: A branch is an instruction in a computer program that can cause a computer to begin executing a different instruction sequence and thus deviate from its default behavior of executing instructions in order (Wikipedia). Basically these are if/else and switch statements. This would also count ternary operators. There are 7 branches in our script, an if/else and 5 cases in our switch.
Functions: Functions are, well functions. Any method or subroutine we define will be counted as a function. We obviously have 3 in our code above. Istanbul will count nested functions too.
Lines: Lines are like statements, but will count a single line with multiple statements as just one line. Line counts are no longer as relevant as they once were, but are maintained for backwards compatibility. Statements are a much more accurate and useful metric.
Execution counts: In the report above, you'll notice the 1x in the margins. This means that the corresponding function, statement, or branch was executed one time. Each time they are run, the count goes up. This useful for seeing how many tests we run against a function.
Completing our test coverage
Let's add a few more tests to complete our test coverage. We'll update our sample-test.js file with the following code:
1'use strict'23const expect = require('chai').expect4const sample = require('../index.js')56describe('Sample Test Script', function() {78 describe('times()', function() {910 it('should equal 10', function() {11 expect(sample.times(2,5)).to.equal(10)12 })1314 it('should equal 6', function() {15 expect(sample.times(3,2)).to.equal(6)16 })1718 it('should equal 25', function() {19 expect(sample.times(5,5)).to.equal(25)20 })2122 })2324 describe('switch()', function() {2526 it('should return "one"', function() {27 expect(sample.switch(1)).to.equal('one')28 })2930 it('should return "two"', function() {31 expect(sample.switch(2)).to.equal('two')32 })3334 it('should return "three"', function() {35 expect(sample.switch(3)).to.equal('three')36 })3738 it('should return "four"', function() {39 expect(sample.switch(4)).to.equal('four')40 })4142 it('should return "unknown"', function() {43 expect(sample.switch(5)).to.equal('unknown')44 })4546 })4748 describe('pow()', function() {49 it('should return 8', function() {50 expect(sample.pow(2,3)).to.equal(8)51 })52 })5354})
Now we've added a test for each one of our functions with several tests to cover possible branches. Let's run our tests and coverage report again.
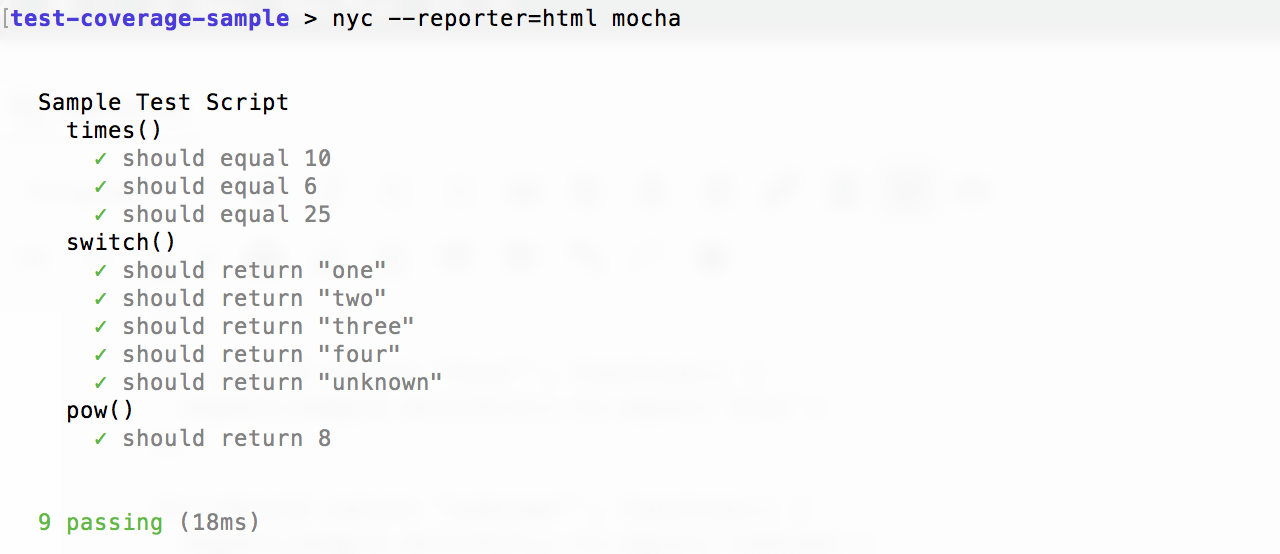
And now our test report looks like this:
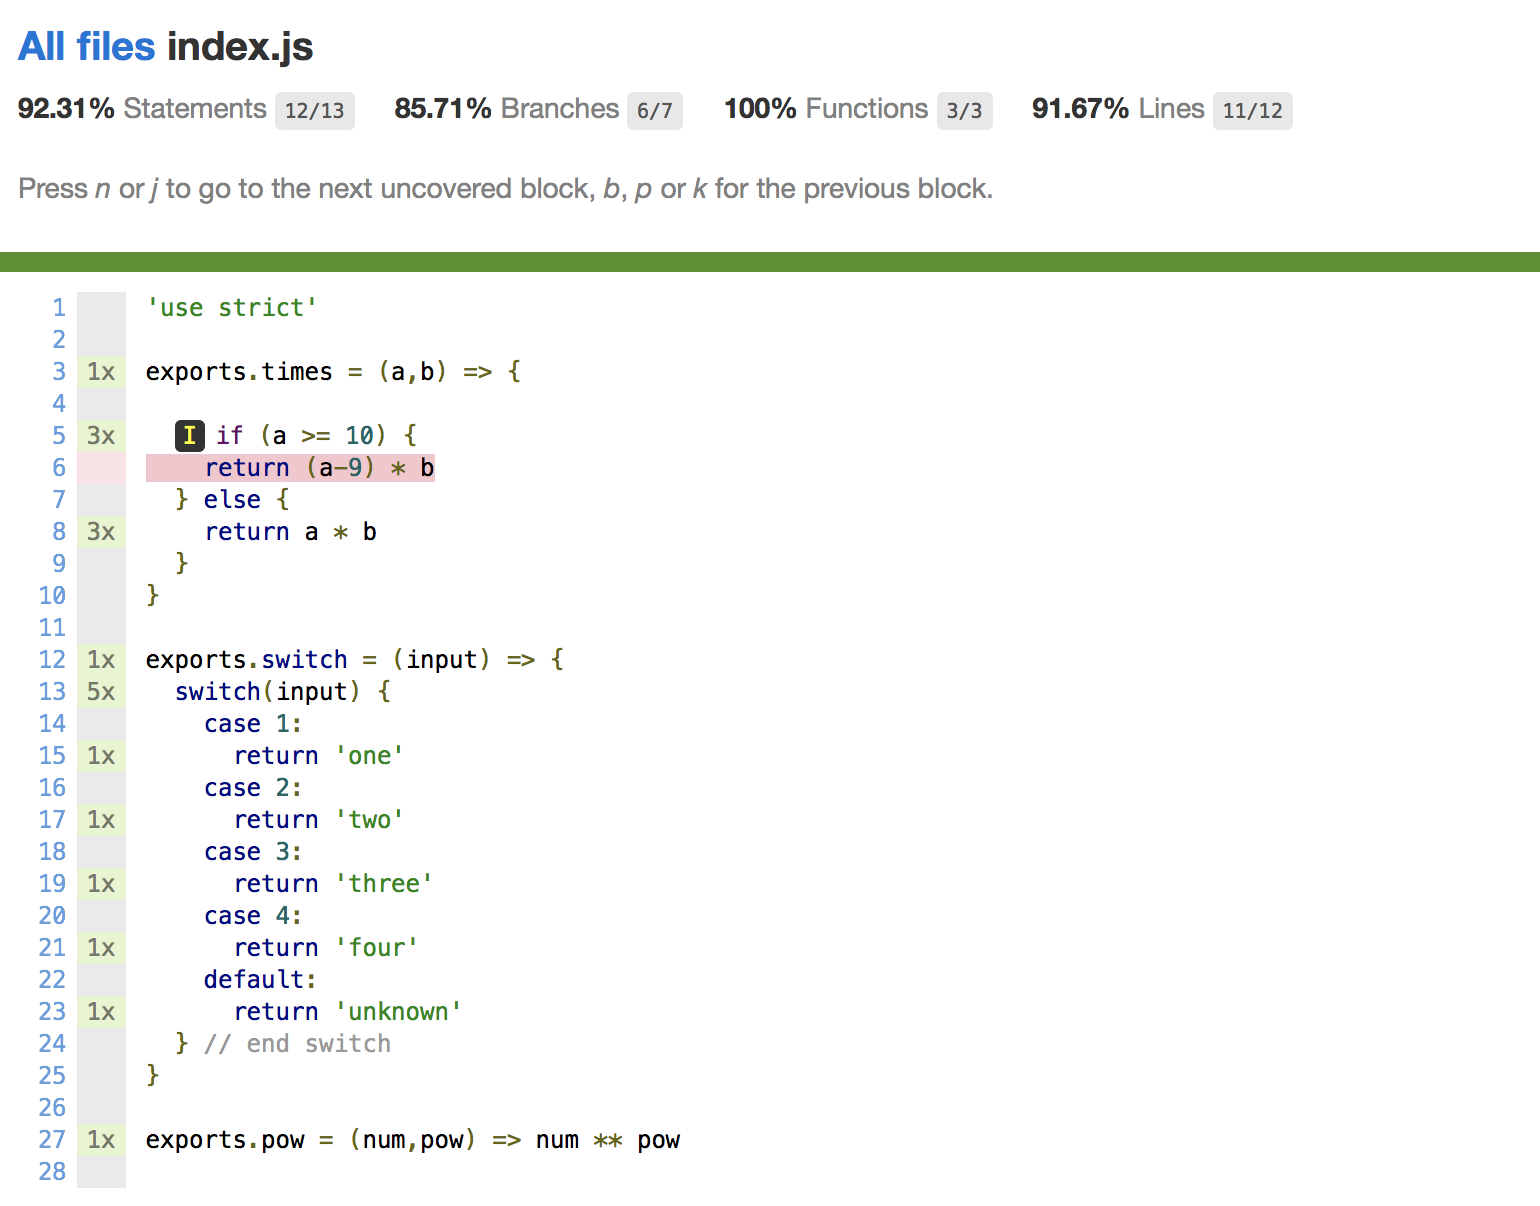
Uh oh, we're not covering all of our branches! This is one of the benefits of test coverage. We can immediately see that we're not testing a piece of our code. Let's add in a test that will execute that branch:
1it('should equal 5', function() {2 expect(sample.times(10,5)).to.equal(5)3})
And when we run it again:
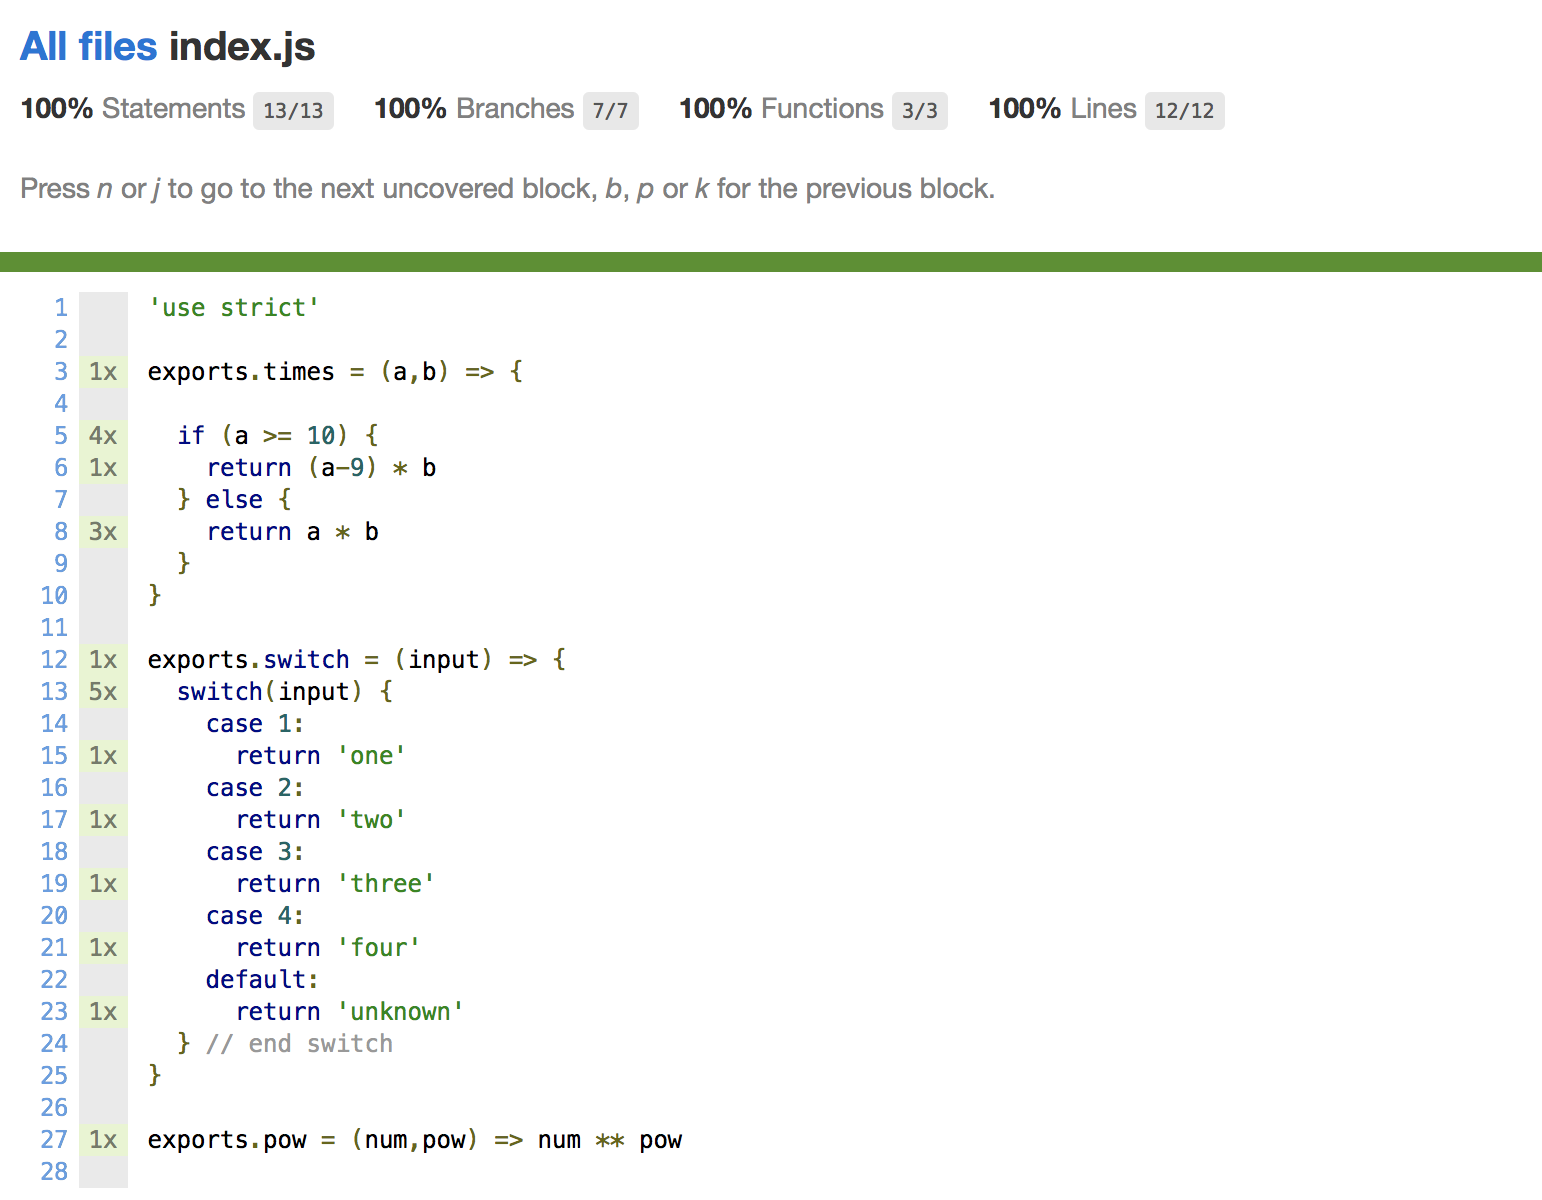
And now we've got full test coverage, sort of. This report gives us a really good indication that we are testing all aspects of our script, but it doesn't tell us everything. What happens if we send a string into the pow() function? What other types of inputs could break our code?
Test coverage reports don't give us information like that. However, we can use the execution counts to give us a good idea of how many times a block was tested. You can see from the report above that line 5 was executed 4 times, with the first branch executing only once and the else block 3 times. The switch statement was evaluated 5 times and then each return statement was executed once. If we have a complex function, we can get an idea of how many tests are being run against it. We should always write defensive code and make sure we create several tests to try and break it.
Testing our Serverless functions
Okay, now that we understand the basics of test coverage, let's see how we can apply it to our Serverless functions. First we need to turn our project into a Serverless project.
Let's make sure we have the Serverless framework installed globally:
1> npm -i serverless -g
Now let's initialize a project in our test-coverage-sample directory:
1> sls create -t aws-nodejs
This will generate our boilerplate code. Let's go into our newly created serverless.yml file and swap out the default code with the following:
1service: test-coverage-sample2provider:3 name: aws4 runtime: nodejs8.1056functions:7 hello:8 handler: handler.hello
Now let's open up the handler.js file that was created and update the code with the following:
1'use strict'23exports.hello = async (event) => {4 const response = {5 statusCode: 200,6 body: JSON.stringify({7 message: this.switch(event)8 })9 }1011 return response12}1314exports.switch = (input) => {15 switch(input) {16 case 1:17 return 'one'18 case 2:19 return 'two'20 case 3:21 return 'three'22 case 4:23 return 'four'24 default:25 return 'unknown'26 } // end switch27}
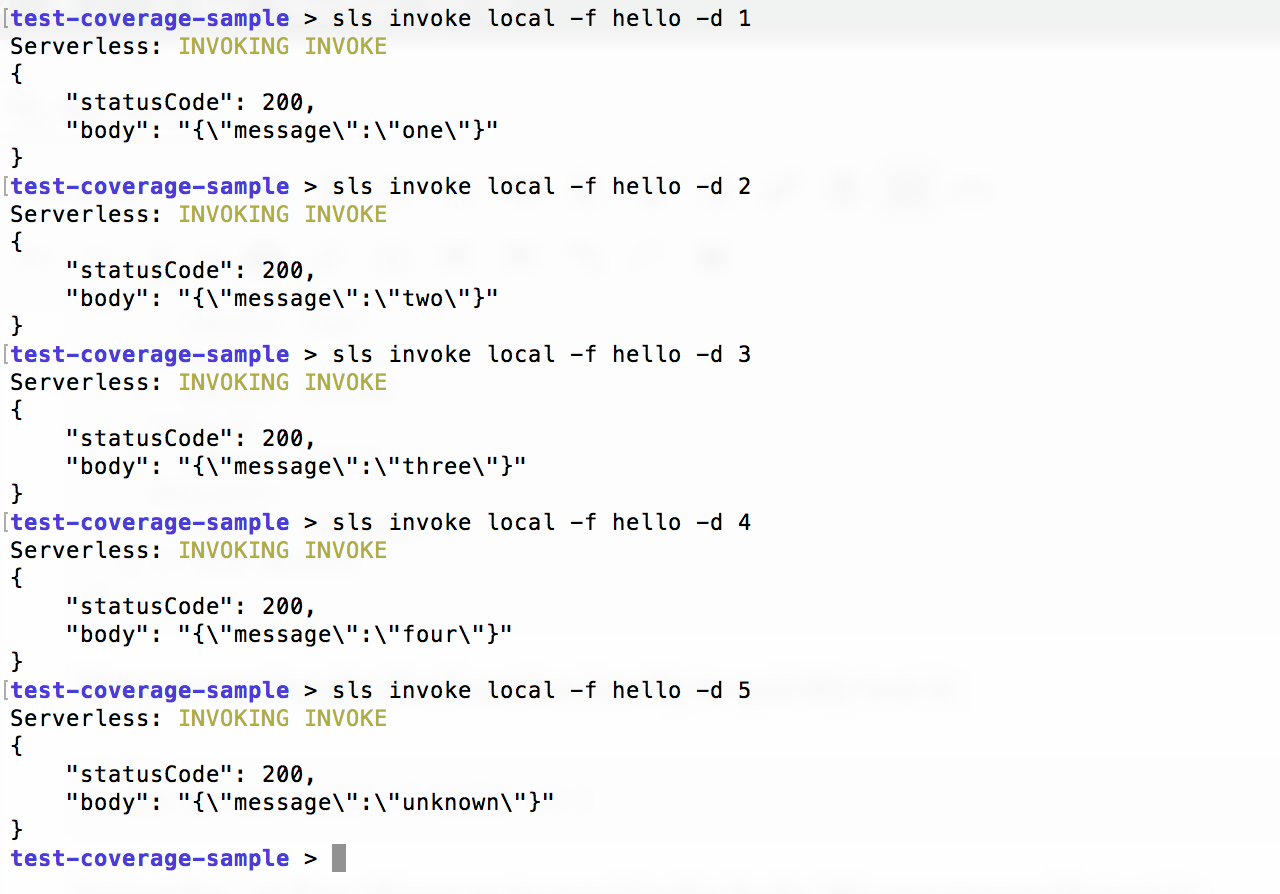
Now we can invoke the function locally to quickly test it:
1> sls invoke local -f hello -d 1
Using the -d flag allows us to send in the body. We can manually test all of our code branches like this:
Of course, we don't want to have to test this all manually, so let's write some Mocha tests.
Writing our Serverless Unit Tests
First, let's get rid of the old tests and the index.js script we wrote:
1rm index.js2rm test/sample-test.js
Now let's create a new test file for our hello function. We're going to create a new directory called "unit" under our test directory first. I like to separate my tests. You'll see why in a minute.
1> mkdir test/unit2> touch test/unit/hello.unit.js
Open our new hello.unit.js unit test file and let's paste in the following code:
1'use strict'23const expect = require('chai').expect4const handler = require('../../handler.js')56describe('hello function tests', function() {78 describe('hello()', async function() {910 it('should return our proxy output', function() {11 let out = await handler.hello(1)12 expect(out).to.deep.equal({ statusCode: 200, body: '{"message":"one"}' })13 })1415 })1617 describe('switch()', function() {1819 it('should return "one"', function() {20 expect(handler.switch(1)).to.equal('one')21 })2223 it('should return "two"', function() {24 expect(handler.switch(2)).to.equal('two')25 })2627 it('should return "three"', function() {28 expect(handler.switch(3)).to.equal('three')29 })3031 it('should return "four"', function() {32 expect(handler.switch(4)).to.equal('four')33 })3435 it('should return "unknown"', function() {36 expect(handler.switch(5)).to.equal('unknown')37 })3839 })4041})
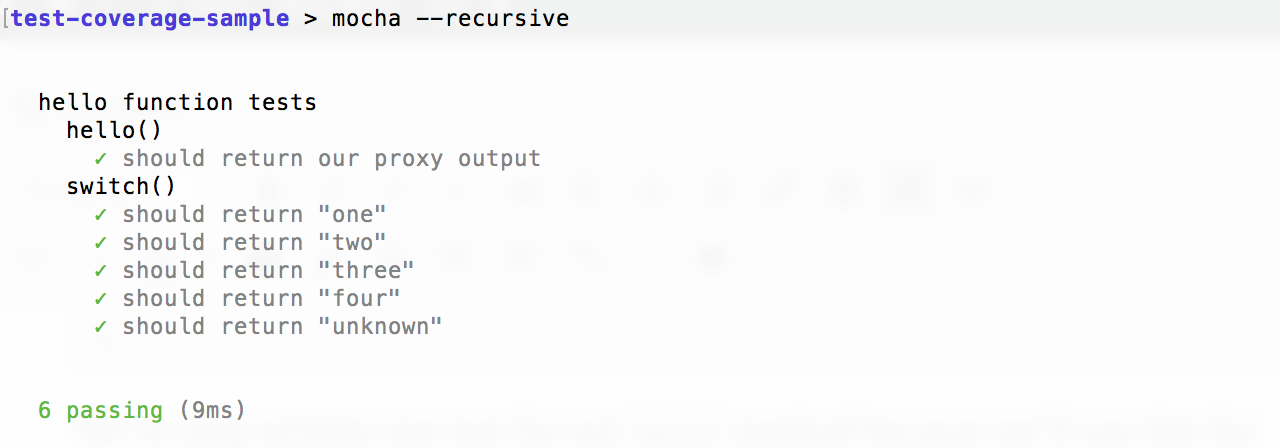
We've only written one test for our hello method because we're only using it for illustration purposes. Let's run Mocha and see if our tests pass. Note that we need to use the --recursive flag if we don't specify the path:
1> mocha --recursive
We should get this:
So far so good. We can even run our coverage report:
1> nyc --reporter=html mocha --recursive
And we get:
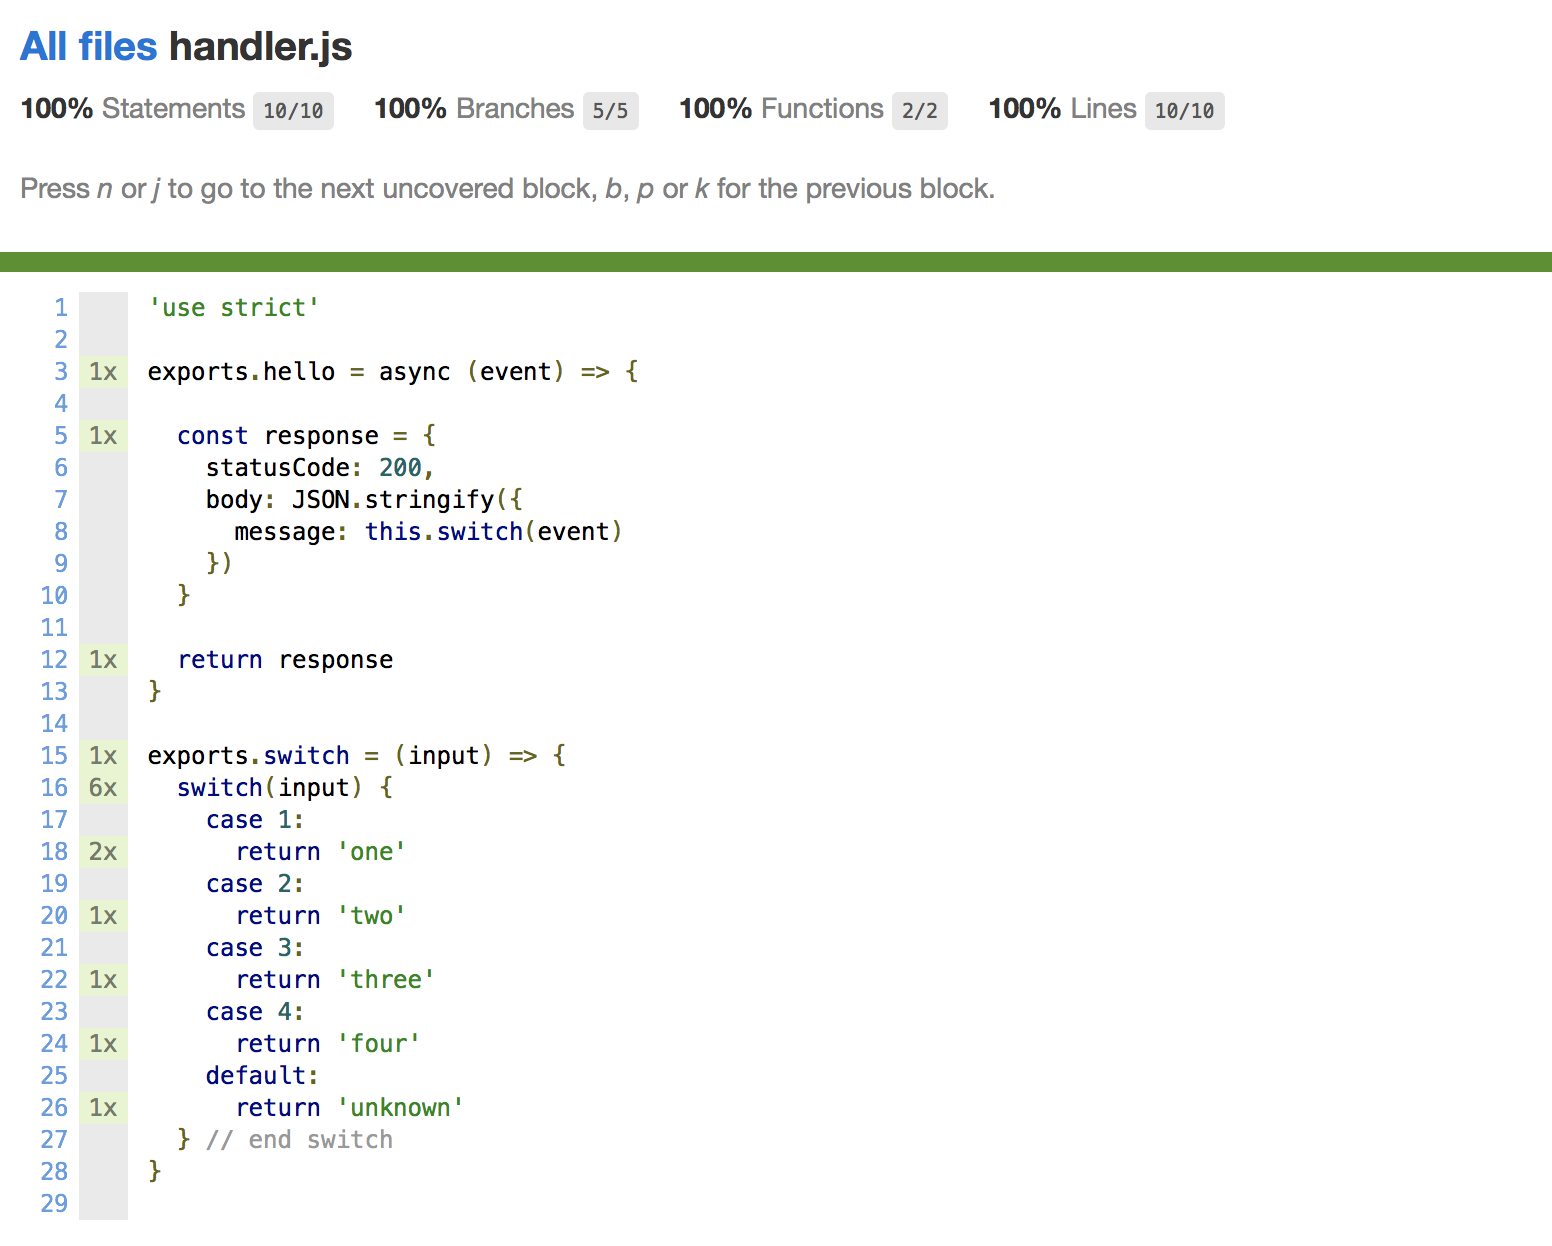
Sweet, so now we have 100% test coverage of our Serveless function. Now let's take advantage of some of the great features of Serverless. Let's add an environment variable. We'll update our serverless.yml:
1service: test-coverage-sample2provider:3 name: aws4 runtime: nodejs8.105 environment:6 TEST: true78functions:9 hello:10 handler: handler.hello
Now let's use it in our hello() function:
1exports.hello = async (event) => {23 const response = {4 statusCode: 200,5 body: JSON.stringify({6 message: this.switch(event),7 test: process.env.TEST8 })9 }1011 return response12}
And we need to update our test:
1describe('hello()', function() {23 it('should return our proxy output', async function() {4 let out = await handler.hello(1)5 expect(out).to.deep.equal({ statusCode: 200, body: '{"message":"one","test":"true"}' })6 })78})
Now let's run our tests:
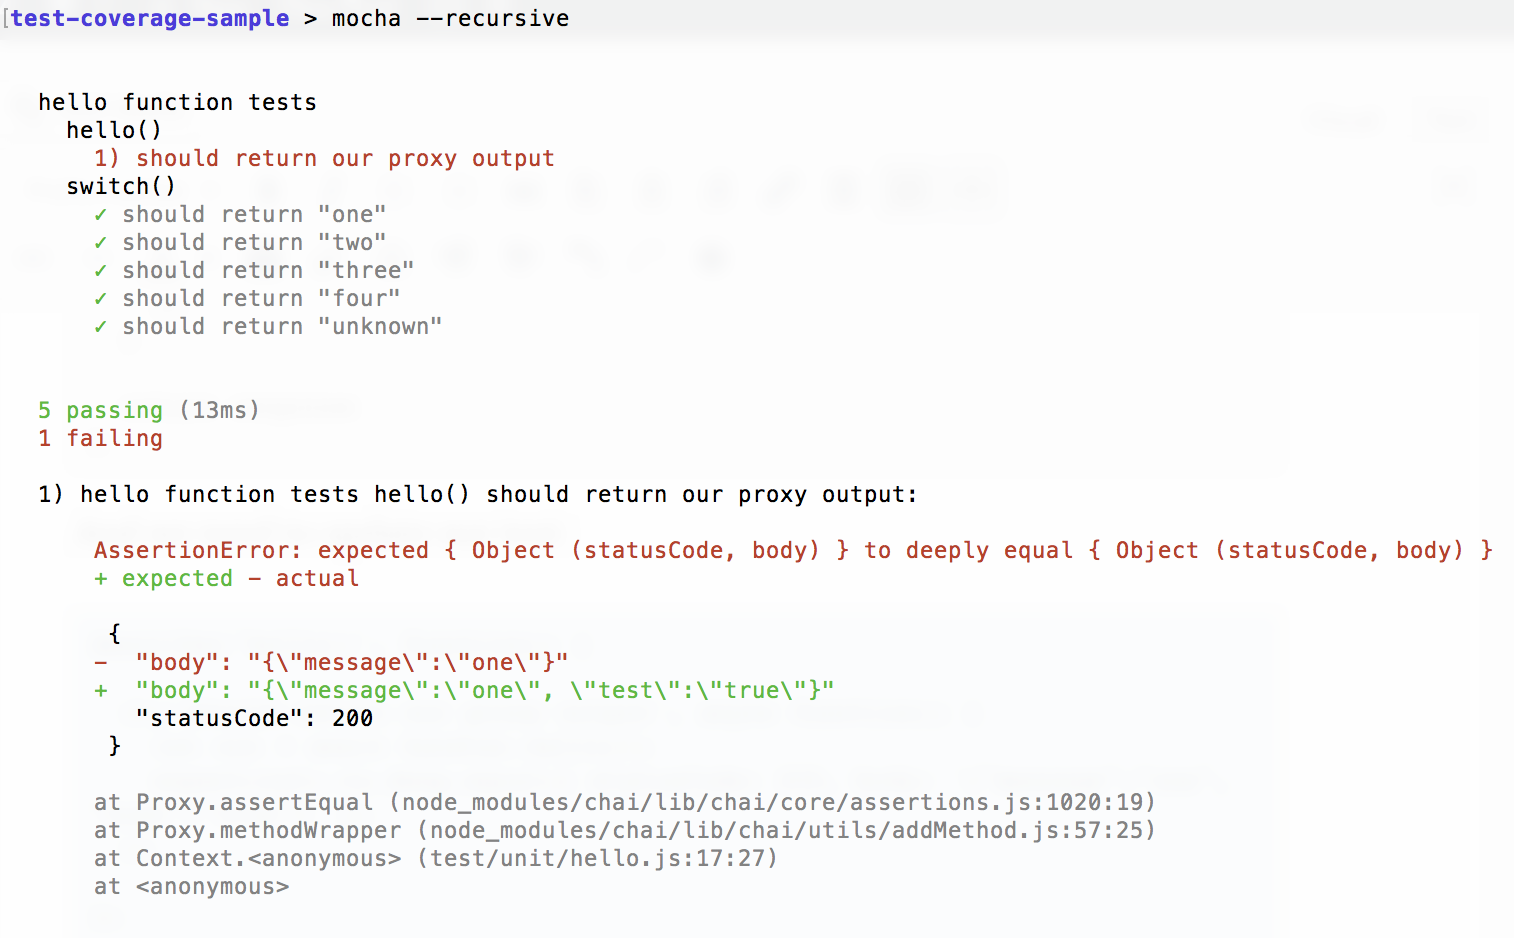
Hmm, it looks like our process.env.TEST is undefined. That's because Serverless is managing our environment variables for us. If we just run the function using node, the environment variables don't exist. No problem, there is a plugin for that!
Using the Serverless Mocha Plugin
There is a great plugin that allows us to run Mocha tests against our Serverless handler functions called the serverless-mocha-plugin. We just need to install it and add it as a plugin in our serverless.yml file. The easiest way is just to use the built in plugin functionality:
1> sls plugin install -n serverless-mocha-plugin
This will install the node module as a dependency and add it to our package.json file. It will also add a plugins section to our serverless.yml file like this:
1plugins:2 - serverless-mocha-plugin
Now let's create a test for our hello function using the new command line features that the serverless-mocha-plugin adds to Serverless:
1> sls create test -f hello
This will create a new file named hello.js in our /test directory. The file looks like this:
1'use strict';23// tests for hello4// Generated by serverless-mocha-plugin56const mochaPlugin = require('serverless-mocha-plugin');7const expect = mochaPlugin.chai.expect;8let wrapped = mochaPlugin.getWrapper('hello', '/handler.js', 'hello');910describe('hello', () => {11 before((done) => {12 done();13 });1415 it('implement tests here', () => {16 return wrapped.run({}).then((response) => {17 expect(response).to.not.be.empty;18 });19 });20});
Let's clean up this test and copy our hello() unit test in. We'll also remove the hello() test from our /test/unit/helo.unit.js file while we're at it.
1'use strict'23const mochaPlugin = require('serverless-mocha-plugin')4const expect = mochaPlugin.chai.expect5let wrapped = mochaPlugin.getWrapper('hello', '/handler.js', 'hello')67describe('hello', function() {89 it('should return our proxy output', async function() {10 let out = await wrapped.run(1)11 expect(out).to.deep.equal({ statusCode: 200, body: '{"message":"one","test":"true"}' })12 })1314})
Much better. Now let's run a Mocha test:
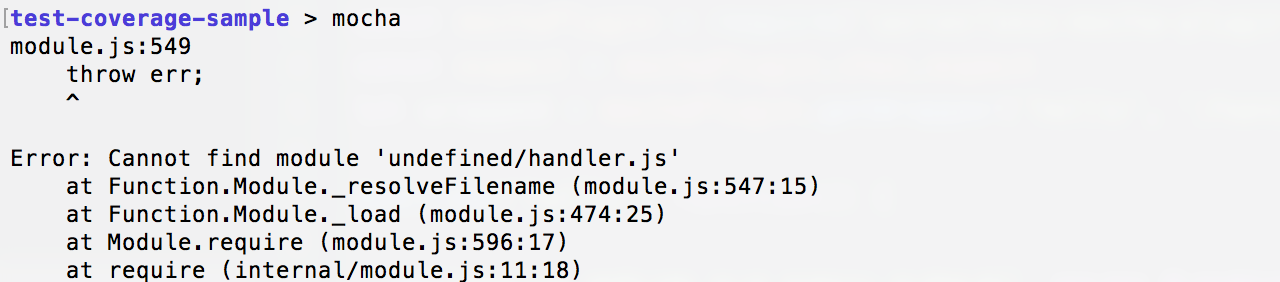
Hmm, that's not good. We're getting this error because we need to bootstrap the function using Serverless first. The serverless-mocha-plugin adds a CLI command for us to do just that:
1> sls invoke test
And now we get:
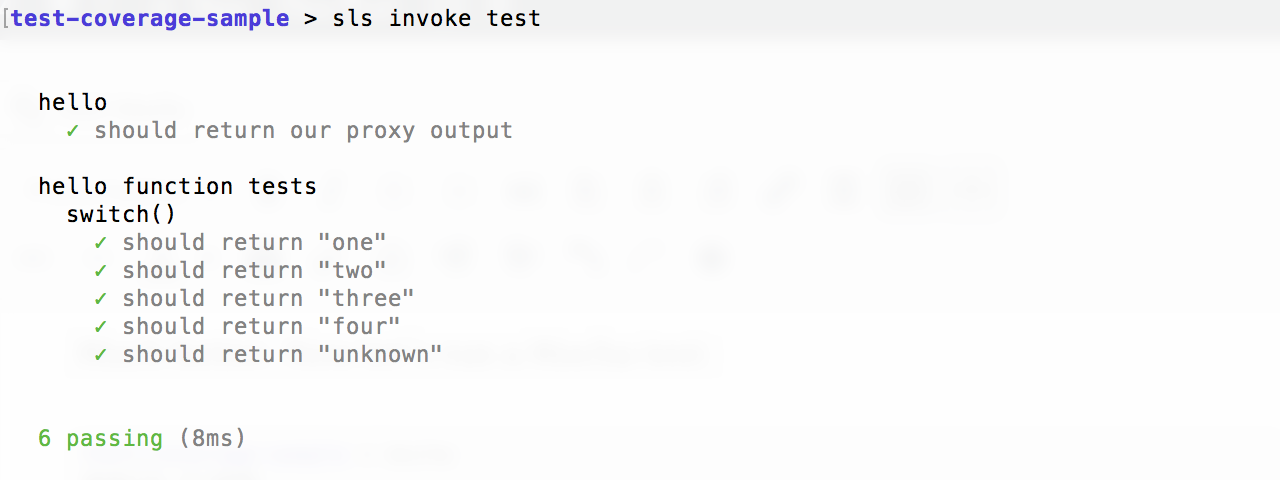
Notice that it not only ran our hello.js tests, but it also ran our hello.unit.js tests as well. This is because the plugin runs Mocha with the --recursive flag for us. When we start to add several more functions, it can get a bit overwhelming to run all these tests at once. If we want to limit it to just a single function's tests, we can run:
1> sls invoke test -f hello
If we want to include our unit tests, we can simply require them in our hello.js test script by adding this to the end of our script:
1require('./unit/hello.unit.js')
Now if we run the test with the -f hello flag or not, we'll get the same result:
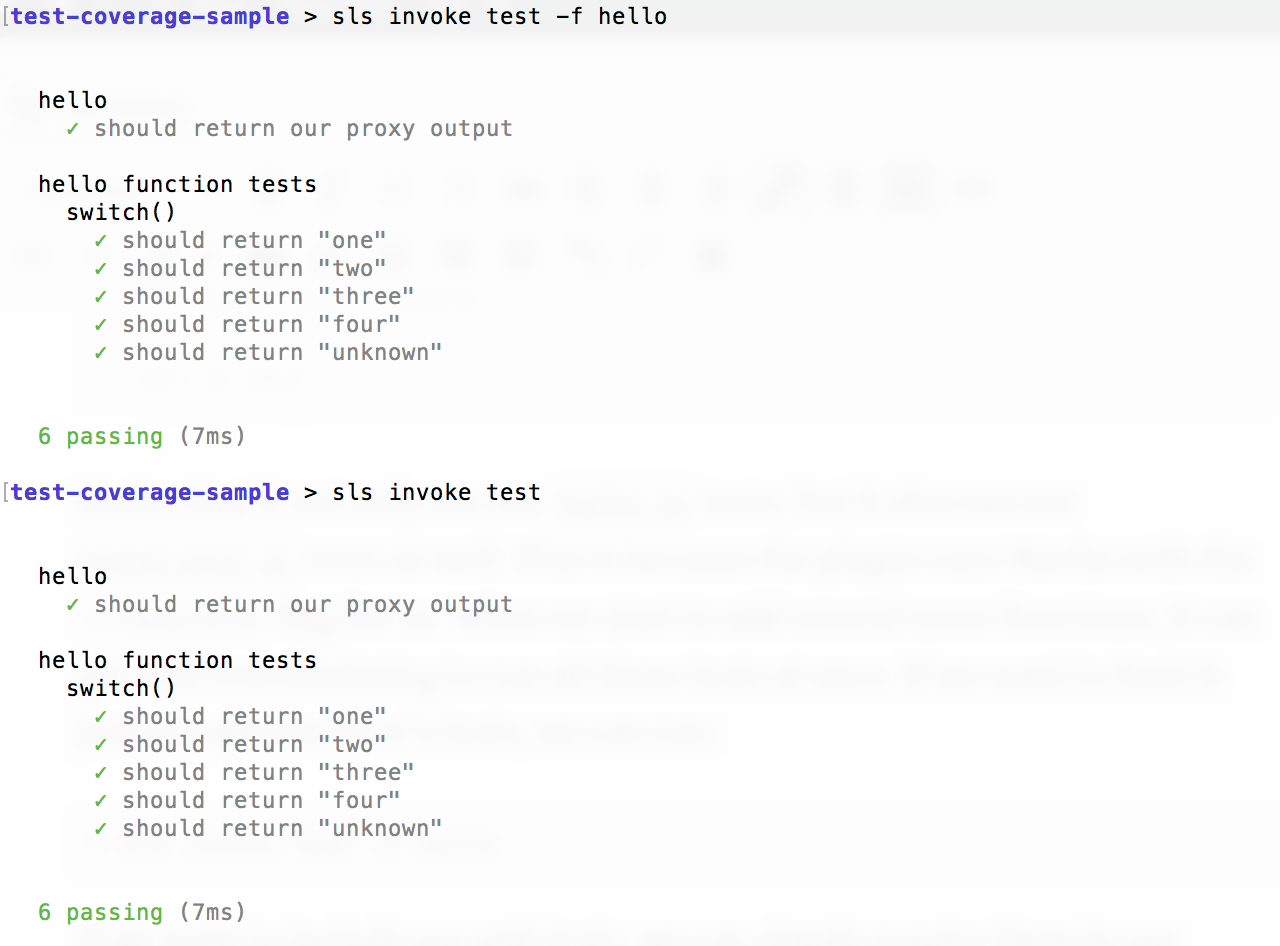
Node is pretty good about remembering and caching dependencies, so it will only run our "unit" tests once. If we had multiple functions in our project, we could run all of our tests (handler, unit, etc.) for that function at once. Pretty cool.
Running our test coverage report
We saw earlier that we can't run mocha directly on our Serverless tests. In order to run our test coverage report, we just need to use our new CLI command in combination with Istanbul:
1> nyc --reporter=html sls invoke test
Our tests will all run and we'll get this:
hello() function and include the benefits of bootstrapping our functions with Serverless.
Some additional tips
Notice in our handler.js file that we used exports.switch to make our switch() function public. Since no other function uses this switch() function, it doesn't make a lot of sense to export it just so we can test it. Let's update our handler function and just make switch a variable. We'll use the __ (double underscore) convention since it is a private variable and switch is a reserved word in JavaScript:
1'use strict'23exports.hello = async (event) => {45 const response = {6 statusCode: 200,7 body: JSON.stringify({8 message: __switch(event),9 test: process.env.TEST10 })11 }1213 return response14}1516const __switch = (input) => {17 switch(input) {18 case 1:19 return 'one'20 case 2:21 return 'two'22 case 3:23 return 'three'24 case 4:25 return 'four'26 default:27 return 'unknown'28 } // end __switch29}
That looks much nicer! Only problem is, our tests will now fail since switch is not longer a public function. Let's install rewire, an NPM module that let's us monkey patch dependencies as well as retrieve private variables:
1> npm i rewire -D
And now we'll update our unit test script:
1'use strict'23const expect = require('chai').expect4const rewire = require('rewire')56const hello = rewire('../../handler.js')7const __switch = hello.__get__('__switch')89describe('hello function tests', function() {1011 describe('switch()', function() {1213 it('should return "one"', function() {14 expect(__switch(1)).to.equal('one')15 })1617 it('should return "two"', function() {18 expect(__switch(2)).to.equal('two')19 })2021 it('should return "three"', function() {22 expect(__switch(3)).to.equal('three')23 })2425 it('should return "four"', function() {26 expect(__switch(4)).to.equal('four')27 })2829 it('should return "unknown"', function() {30 expect(__switch(5)).to.equal('unknown')31 })3233 })3435})
Instead of requireing our handler script, we'll rewire it instead. Now we can use the .__get__('__switch') api to retrieve a reference to the private __switch method. When we run our tests, all is well.
You can also add shortcuts to your package.json file so you don't have to type out the test commands each time. For example, you could add the following to your package.json's scripts section:
1"scripts": {2 "test": "sls invoke test",3 "test-cov": "nyc --reporter=html sls invoke test",4 "test-unit": "mocha test/unit"5}
Now you can run the following as shortcuts for the above tests:
1> npm test2> npm run test-cov3> npm run test-unit
Have fun testing!
Adding tests to your Serverless functions gives you confidence that your application is going to perform as expected. Adding test coverage reporting makes indentifying untested or under-tested sections of your code much easier. You can also add a number of configurations to your package.json file that will let you include/exclude certain files, fail tests if code coverage doesn't meet a certain threshold, and much more. Check out the nyc Github repo for all the options.
☝️ REMEMBER: Test coverage is NOT a silver bullet. It will certainly help us make sure all our functions, statements and branches are run as part of our test suites, but it won't tell us if we're covering every possible scenario.
I hope you found this post useful. Good luck and have fun testing your Serverless functions. 😜